سعر فوب
أحصل على آخر سعر|
- Minimum Order
بلد:
China
نموذج رقم:
-
سعر فوب:
الموقع:
-
سعر الحد الأدنى للطلب:
-
الحد الأدني للطلب:
-
تفاصيل التغليف:
-
موعد التسليم:
-
القدرة على التوريد:
-
نوع الدفع:
-
مجموعة المنتج :

China
الشخص الذي يمكن الاتصال به Mr. Wilson
6-703, FUYUAN COMMUNITY, YUFU ROAD, LONGGANG DISTRICT, SHENZHEN, CHINA, Muping, Sichuan
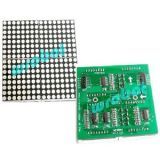
Occupy few MCU ports, ability of scrolling display of a few
hundred words*-screen series, text scrolling display, can build
electronic billboards
Features:
1, Use high-quality bright LED DOT-matrix block
2, Optimized circuit design, with brightness uniformity
3, Standard interface that can be expanded in a variety of
development boards
4, Multi-screen connectivity is available
5, ***-line scan, **5 numbers
6, Applicable to a variety of platforms including Arduino / AVR /
ARM
Able to support direct multi-screen connection, it can achieve
rolling display by cascading the LED *6**6 Matrix directly like
putting up building block only with 5 pin jumper wire.
How to achieve the cascading and achieve rolling display?
The answer is that you just need two 5 pin jumper cables used to
link one LED brick to another, then you have achieve rolling
display, because our circuit have solved all the query at the back
stage. So this allow that you can cascade as more piece as you
can.
However it occupy few MCU interface and own the ability of
scrolling display of hundreds of words.
Support text, cartoon, etc scrolling display, so you can build
electronic billboards and any other application you need
easily.
The most important is that: You can achieve what you need and what
you imagine in your mind about Matrix LED.
Now I am telling you something of LED Array Screen. I will show you
an DIY experiment.
Tools used:
1. Arduino Duemilanove with ATmega **8
2. Arduino Sensor shield V4.0
3. *-pin jumper wire
4. *-pin jumper wire
5. Wrobot *6X*6 LED Array Screen
Connect digital pin 4, 5, 6, 7 to pin OIA, OIB, OIC, OID of
LED screen, which choose the row. Connect digital pin 8, 9, *0 to
pin SER, SCK, RCKof screen, which the data of a row. Connect
GND and VCC to power.
Extension connection is very easy too. Connect pin on the OUT side
of one board to the pin with the same name on the IN side of the
next board.
In fact, you can assemble a screen of ant size you want(times of
*6), large square screen or long screen. And you can program it to
display anything you want.
| بلد: | China |
| نموذج رقم: | - |
| سعر فوب: | أحصل على آخر سعر |
| الموقع: | - |
| سعر الحد الأدنى للطلب: | - |
| الحد الأدني للطلب: | - |
| تفاصيل التغليف: | - |
| موعد التسليم: | - |
| القدرة على التوريد: | - |
| نوع الدفع: | - |
| مجموعة المنتج : | arduino board and accessories |


")